
diff options
| author | ruki <[email protected]> | 2017-03-01 10:25:27 +0800 |
|---|---|---|
| committer | ruki <[email protected]> | 2017-03-01 10:25:27 +0800 |
| commit | 9ee988e836ad63df492b468c0b3b730b7be372f0 (patch) | |
| tree | bd77e9a1b2a9889c1c0ee9102a57ad7475cdaa71 /docs | |
| parent | 4ddc67536933d296e667bd17f2dfe405d62da7a8 (diff) | |
write some bultin api docs
Diffstat (limited to 'docs')
| -rwxr-xr-x | docs/zh/manual.md | 521 |
1 files changed, 519 insertions, 2 deletions
diff --git a/docs/zh/manual.md b/docs/zh/manual.md index a91466e21..353f05917 100755 --- a/docs/zh/manual.md +++ b/docs/zh/manual.md @@ -83,7 +83,7 @@ if is_arch("arm*") then end ``` -用*就可以匹配所有了。。 +用`*`就可以匹配所有了。。 ##### is_plat @@ -2440,7 +2440,7 @@ platforms - myplat2 - xmake.lua -`` +``` 其中`xmake.lua`为每个平台的主描述文件,相当于入口描述。 @@ -2763,18 +2763,535 @@ end) ###### 导入扩展摸块 +import的主要用于导入xmake的扩展类库以及一些自定义的类库模块,一般用于: + +* 自定义脚本([on_build](#targeton_build), [on_run](#targeton_run) ..) +* 插件开发 +* 模板开发 +* 平台扩展 +* 自定义任务task + +导入机制如下: + +1. 优先从当前脚本目录下导入 +2. 再从扩展类库中导入 + +导入的语法规则: + +基于`.`的类库路径规则,例如: + +导入core核心扩展模块 + +```lua +import("core.base.option") +import("core.project") +import("core.project.task") +import("core") + +function main() + + -- 获取参数选项 + print(option.get("version")) + + -- 运行任务和插件 + task.run("hello") + project.task.run("hello") + core.project.task.run("hello") +end +``` + +导入当前目录下的自定义模块: + +目录结构: + +``` +plugin + - xmake.lua + - main.lua + - modules + - hello1.lua + - hello2.lua +``` + +在main.lua中导入modules + +```lua +import("modules.hello1") +import("modules.hello2") +``` + +导入后就可以直接使用里面的所有公有接口,私有接口用`_`前缀标示,表明不会被导出,不会被外部调用到。。 + +除了当前目录,我们还可以导入其他指定目录里面的类库,例如: + +```lua +import("hello3", {rootdir = "/home/xxx/modules"}) +``` + +为了防止命名冲突,导入后还可以指定的别名: + +```lua +import("core.platform.platform", {alias = "p"}) + +function main() + + -- 这样我们就可以使用p来调用platform模块的plats接口,获取所有xmake支持的平台列表了 + table.dump(p.plats()) +end +``` + +import不仅可以导入类库,还支持导入的同时作为继承导入,实现模块间的继承关系 + +```lua +import("xxx.xxx", {inherit = true}) +``` + +这样导入的不是这个模块的引用,而是导入的这个模块的所有公有接口本身,这样就会跟当前模块的接口进行合并,实现模块间的继承。 + ##### inherit + +###### 导入并继承基类模块 + +这个等价于[import](#import)接口的`inherit`模式,也就是: + +```lua +import("xxx.xxx", {inherit = true}) +``` + +用`inherit`接口的话,会更简洁些: + +```lu +inherit("xxx.xxx") +``` + +使用实例,可以参看xmake的tools目录下的脚本:[clang.lua](#https://github.com/tboox/xmake/blob/master/xmake/tools/clang.lua) + +这个就是clang工具模块继承了gcc的部分实现。 + ##### ifelse + +###### 类似三元条件判断 + +由于lua没有内置的三元运算符,通过封装`ifelse`接口,实现更加简洁的条件选择: + +```lua +local ok = ifelse(a == 0, "ok", "no") +``` + ##### try-catch-finally + +###### 异常捕获 + +lua原生并没有提供try-catch的语法来捕获异常处理,但是提供了`pcall/xpcall`等接口,可在保护模式下执行lua函数。 + +因此,可以通过封装这两个接口,来实现try-catch块的捕获机制。 + +我们可以先来看下,封装后的try-catch使用方式: + +```lua +try +{ + -- try 代码块 + function () + error("error message") + end, + + -- catch 代码块 + catch + { + -- 发生异常后,被执行 + function (errors) + print(errors) + end + } +} +``` + +上面的代码中,在try块内部认为引发了一个异常,并且抛出错误消息,在catch中进行了捕获,并且将错误消息进行输出显示。 + +这里除了对`pcall/xpcall`进行了封装,用来捕获异常信息,还利用了lua的函数调用语法特性,在只有一个参数传递的情况下,lua可以直接传递一个table类型,并且省略`()` + +其实try后面的整个`{...}` 都是一个table而已,作为参数传递给了try函数,其具体实现如下: + +```lua +function try(block) + + -- get the try function + local try = block[1] + assert(try) + + -- get catch and finally functions + local funcs = block[2] + if funcs and block[3] then + table.join2(funcs, block[2]) + end + + -- try to call it + local ok, errors = pcall(try) + if not ok then + + -- run the catch function + if funcs and funcs.catch then + funcs.catch(errors) + end + end + + -- run the finally function + if funcs and funcs.finally then + funcs.finally(ok, errors) + end + + -- ok? + if ok then + return errors + end +end +``` + +可以看到这里用了`pcall`来实际调用try块里面的函数,这样就算函数内部出现异常,也不会中断程序,`pcall`会返回false表示运行失败 + +通过上面的实现,会发现里面其实还有个finally的处理,这个的作用是对于`try{}`代码块,不管是否执行成功,都会执行到finally块中 + +也就说,其实上面的实现,完整的支持语法是:`try-catch-finally`模式,其中catch和finally都是可选的,根据自己的实际需求提供 + +例如: + +```lua +try +{ + -- try 代码块 + function () + error("error message") + end, + + -- catch 代码块 + catch + { + -- 发生异常后,被执行 + function (errors) + print(errors) + end + }, + + -- finally 代码块 + finally + { + -- 最后都会执行到这里 + function (ok, errors) + -- 如果try{}中存在异常,ok为true,errors为错误信息,否则为false,errors为try中的返回值 + end + } +} + +``` + +或者只有finally块: + +```lua +try +{ + -- try 代码块 + function () + return "info" + end, + + -- finally 代码块 + finally + { + -- 由于此try代码没发生异常,因此ok为true,errors为返回值: "info" + function (ok, errors) + end + } +} +``` + +处理可以在finally中获取try里面的正常返回值,其实在仅有try的情况下,也是可以获取返回值的: + +```lua +-- 如果没发生异常,result 为返回值:"xxxx",否则为nil +local result = try +{ + function () + return "xxxx" + end +} +``` + +可以看到,这个基于pcall的`try-catch-finally`异常捕获封装,使用上还是非常灵活的,而且其实现相当的简单 + +在xmake的自定义脚本、插件开发中,也是完全基于此异常捕获机制 + +这样使得扩展脚本的开发非常的精简可读,省去了繁琐的`if err ~= nil then`返回值判断,在发生错误时,xmake会直接抛出异常进行中断,然后高亮提示详细的错误信息。 + +例如: + +```lua +target("test") + set_kind("binary") + add_files("src/*.c") + + -- 在编译完ios程序后,对目标程序进行ldid签名 + after_build(function (target)) + os.run("ldid -S %s", target:targetfile()) + end +``` + +只需要一行`os.run`就行了,也不需要返回值判断是否运行成功,因为运行失败后,xmake会自动抛异常,中断程序并且提示错误 + +如果你想在运行失败后,不直接中断xmake,继续往下运行,可以自己加个try快就行了: + +```lua +target("test") + set_kind("binary") + add_files("src/*.c") + + after_build(function (target)) + try + { + function () + os.run("ldid -S %s", target:targetfile()) + end + } + end +``` + +如果还想捕获出错信息,可以再加个catch: + +```lua +target("test") + set_kind("binary") + add_files("src/*.c") + + after_build(function (target)) + try + { + function () + os.run("ldid -S %s", target:targetfile()) + end, + catch + { + function (errors) + print(errors) + end + } + } + end +``` + +不过一般情况下,在xmake中写自定义脚本,是不需要手动加try-catch的,直接调用各种api,出错后让xmake默认的处理程序接管,直接中断就行了。。 + ##### pairs + +###### 用于遍历字典 + +这个是lua原生的内置api,在xmake中,在原有的行为上对其进行了一些扩展,来简化一些日常的lua遍历代码。 + +先看下默认的原生写法: + +```lua +local t = {a = "a", b = "b", c = "c", d = "d", e = "e", f = "f"} + +for key, val in pairs(t) do + print("%s: %s", key, val) +end +``` + +这对于通常的遍历操作就足够了,但是如果我们相对其中每个遍历出来的元素,获取其大写,我们可以这么写: + +```lua +for key, val in pairs(t, function (v) return v:upper() end) do + print("%s: %s", key, val) +end +``` + +甚至传入一些参数到第二个`function`中,例如: + +```lua +for key, val in pairs(t, function (v, a, b) return v:upper() .. a .. b end, "a", "b") do + print("%s: %s", key, val) +end +``` + ##### ipairs + +###### 用于遍历数组 + +这个是lua原生的内置api,在xmake中,在原有的行为上对其进行了一些扩展,来简化一些日常的lua遍历代码。 + +先看下默认的原生写法: + +```lua +for idx, val in ipairs({"a", "b", "c", "d", "e", "f"}) do + print("%d %s", idx, val) +end +``` + +扩展写法类似[pairs](#pairs)接口,例如: + +```lua +for idx, val in ipairs({"a", "b", "c", "d", "e", "f"}, function (v) return v:upper() end) do + print("%d %s", idx, val) +end + +for idx, val in ipairs({"a", "b", "c", "d", "e", "f"}, function (v, a, b) return v:upper() .. a .. b end, "a", "b") do + print("%d %s", idx, val) +end +``` + +这样可以简化`for`块代码的逻辑,例如我要遍历指定目录,获取其中的文件名,但不包括路径,就可以通过这种扩展方式,简化写法: + +```lua +for _, filename in ipairs(os.dirs("*"), path.filename) do + -- ... +end +``` + ##### print + +###### 换行打印终端日志 + +此接口也是lua的原生接口,xmake在原有行为不变的基础上也进行了扩展,同时支持:格式化输出、多变量输出。 + +先看下原生支持的方式: + +```lua +print("hello xmake!") +print("hello", "xmake!", 123) +``` + +并且同时还支持扩展的格式化写法: + +```lua +print("hello %s!", "xmake") +print("hello xmake! %d", 123) +``` + +xmake会同时支持这两种写法,内部会去自动智能检测,选择输出行为。 + ##### printf + +###### 无换行打印终端日志 + +类似[print](#print)接口,唯一的区别就是不换行。 + ##### cprint + +###### 换行彩色打印终端日志 + +行为类似[print](#print),区别就是此接口还支持彩色终端输出,并且支持`emoji`字符输出。 + +例如: + +```lua + cprint('${bright}hello xmake') + cprint('${red}hello xmake') + cprint('${bright green}hello ${clear}xmake') + cprint('${blue onyellow underline}hello xmake${clear}') + cprint('${red}hello ${magenta}xmake') + cprint('${cyan}hello ${dim yellow}xmake') +``` + +显示结果如下: + +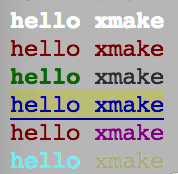 + +跟颜色相关的描述,都放置在 `${ }` 里面,可以同时设置多个不同的属性,例如: + +``` + ${bright red underline onyellow} +``` + +表示:高亮红色,背景黄色,并且带下滑线 + +所有这些描述,都会影响后面一整行字符,如果只想显示部分颜色的文字,可以在结束位置,插入`${clear}`清楚前面颜色描述 + +例如: + +``` + ${red}hello ${clear}xmake +``` + +这样的话,仅仅hello是显示红色,其他还是正常默认黑色显示。 + +其他颜色属于,我这里就不一一介绍,直接贴上xmake代码里面的属性列表吧: + +```lua + colors.keys = + { + -- 属性 + reset = 0 -- 重置属性 + , clear = 0 -- 清楚属性 + , default = 0 -- 默认属性 + , bright = 1 -- 高亮 + , dim = 2 -- 暗色 + , underline = 4 -- 下划线 + , blink = 5 -- 闪烁 + , reverse = 7 -- 反转颜色 + , hidden = 8 -- 隐藏文字 + + -- 前景色 + , black = 30 + , red = 31 + , green = 32 + , yellow = 33 + , blue = 34 + , magenta = 35 + , cyan = 36 + , white = 37 + + -- 背景色 + , onblack = 40 + , onred = 41 + , ongreen = 42 + , onyellow = 43 + , onblue = 44 + , onmagenta = 45 + , oncyan = 46 + , onwhite = 47 +``` + +除了可以色彩高亮显示外,如果你的终端是在macosx下,lion以上的系统,xmake还可以支持emoji表情的显示哦,对于不支持系统,会 +忽略显示,例如: + +```lua + cprint("hello xmake${beer}") + cprint("hello${ok_hand} xmake") +``` + +上面两行代码,我打印了一个homebrew里面经典的啤酒符号,下面那行打印了一个ok的手势符号,是不是很炫哈。。 + +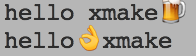 + +所有的emoji表情,以及xmake里面对应的key,都可以通过[emoji符号](http://www.emoji-cheat-sheet.com/)里面找到。。 + ##### cprintf + +###### 无换行彩色打印终端日志 + +此接口类似[cprint](#cprint),区别就是不换行输出。 + ##### format + +###### 格式化字符串 + +如果只是想格式化字符串,不进行输出,可以使用这个接口,此接口跟[string.format](#string-format)接口等价,只是个接口名简化版。 + +```lua +local s = format("hello %s", xmake) +``` + ##### raise +###### 抛出异常中断程序 + +如果想在自定义脚本、插件任务中中断xmake运行,可以使用这个接口跑出异常,如果上层没有显示调用[try-catch](#try-catch-finally)捕获的话,xmake就会中断执行,并且显示出错信息。 + +```lua +if (errors) raise(errors) +``` + +如果在try块中抛出异常,就会在catch和finally中进行errors信息捕获,具体见:[try-catch](#try-catch-finally) + ##### table ###### table.insert |